I’m really excited to kick off a multi-part series this month – and it’s all about pen testing (a.k.a. penetration testing or ethical hacking)! In case you’re unfamiliar with the term, Wikipedia defines pen testing as “the practice of testing a computer system, network, or web application to find vulnerabilities that an attacker could exploit.”
My goals in this series are:
- Give you a “behind the scenes” look at conducting a pen test, step by step.
- Make it interactive – I’ll post all scripts/tools/screenshots so you can play along at home!
- Talk about general things you can do to secure your network from common risks we see while conducting pen tests.
Be prepared: this will be a lot of fun. Also, be aware that this series will get pretty heavy into technical-focused discussion and tools. However, even if you don’t wear a pocket protector or have a neck beard, hang in there. I will do my best to explain everything in as conversational language as possible (because that’s how I prefer to learn things too!).
It’s 10 p.m. Do you know what’s plugged into your network?
One of the easiest ways an attacker can discover vulnerabilities on your network is by doing what is called a port scan.
Let me toss a bookmark in this discussion for one second to give you a quick primer on ports. Computers and network devices use ports to communicate with each other. For example, when you go to print a document, your printer is “listening” on a port (or several ports) to receive that document and print it. In the same way, your machine “listens” on many ports depending on what software/services you have running.
We won’t go into too much detail on that, but if you’re curious about which ports are listening on your machine, check out a free tool called CurrPorts. On my machine, for example, I see that Dropbox, Spotify and a few other apps are listening on various ports:
![]()
All right, back to port scans. One popular tool that is often used to scan for open ports is called nmap. It’s free and available for just about every operating system. Personally, I like to use it in conjunction with Kali Linux, because nmap comes bundled along with dozens of other helpful tools.
I will be using Kali for all the exercises in this blog series, so it might be easiest to install Kali if you want to follow along.
Once you have nmap installed and you are plugged into your home network, you’re ready to start scanning. Quick note: Did you notice I said “plugged into your home network?” Yeah, please don’t try these activities at work – they generate a lot of network traffic and could make you very unpopular with the IT department.
Ok, my network is in the 192.168.1.x range, so I’m going to issue the following command:
nmap -n -Pn -PS -p 1-65535 –script /usr/share/nmap/scripts/banner-plus.nse –min-parallelism=512 -oA MyCompany 192.168.1.1-254 -v
Yikes! That looks awfully confusing to the untrained eye, I’m sure.
Here’s a brief breakdown of what these commands and flags mean:
- Nmap – calls the scanning program into action!
- -n – disables DNS resolution (basically, it helps speed up the scan)
- Pn – don’t ping IPs first, just scan ‘em
- -p 1-65535 – scans all ports on every host, which gives us the most thorough results possible
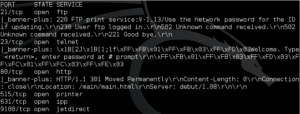
- –script /usr/share/nmap/scripts/banner-plus.nse – this calls a script (get it here) which pulls a “banner” (more detailed information) from any open ports it finds
- –min-parallelism=512 – helps guarantee that the scan will finish by a certain time
- -oA MyCompany – this takes all the info gathered by the scan and dumps it to several different types of files with a prefix of MyCompany. You could call this whatever you want (Work, Home, Test, etc.)
- -v – this turns on verbose logging so you can watch the details of the scan as it happens
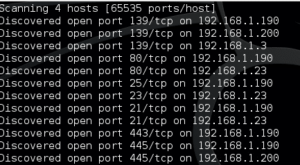
Once the scan is kicked off, the output will show any open ports discovered:

Putting the scan into perspective
When the scan is done, you will have three output files:

Open up any of these, and you might recoil a little bit at the format – it’s ugly!

To help us make more sense of this, I’m going to bring another tool into the mix – a free script called EyeWitness, which can chew through this cluttered scan output and give us a format that’s a bit more human-readable.
So grab EyeWitness and then issue the following command:
./EyeWitness.py -f MyCompany.xml –all-protocols -d /eyewitness
Here’s the breakdown of this command:
- EyeWitness.py – calls the EyeWitness tool to action!
- –f MyCompany.xml – tells EyeWitness that it will be analyzing the MyCompany.xml file, which is one of the output files we generated during the nmap scan
- –all-protocols – indicates that we want to see relevant information for any open ports, not just common ports like remote desktop or FTP
- -d /eyewitness – tells EyeWitness to dump the output into a root folder called eyewitness
When EyeWitness is done doing its magic, the /eyewitness folder will have a whole slew of files in it:

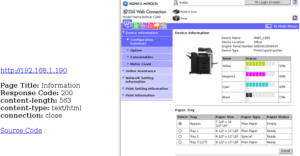
Using a web browser, open the report.html, and you’ll be treated to a nice summary of port information, as well as screenshots and other information nmap found during its scan:

Let the hacking begin (well, kinda)
Now that we are armed with a thorough scan of our network, as well as an easy-to-read roadmap of “interesting” open ports, we can start taking things to the next level. This will involve taking a closer look at the types of services running on these ports, gathering version numbers of software packages, and probably doing a lot of Googling too.
So join me next month and we’ll keep peeling back the pen testing layers to figure out which of our targets may be vulnerable to attacks. The next step is actual hacking!
Conclusion
Conclusion? Ha! We’re just getting started! But if you have questions at any point during this blog series, please do not hesitate to reach out.


