Phishing is one of the most prevalent and effective forms of social engineering. Attackers use various methods, including email, voice, and text messages (SMS), combined with personal details they learn from publicly available sources to get their targets to give out sensitive information or access to funds. One of the best ways you can prevent becoming a victim of phishing is to learn about exactly what it is and how it is executed, and then to take some simple steps to help protect yourself. We’ve included phishing attack examples below followed by security practices that can help you prepare your users and organization.
What is phishing?
Phishing is the fraudulent practice wherein an attacker sends emails pretending to represent an entity or be a person who may or may not exist in order to gain various personal or company information from the target. Passwords, credit cards numbers, and other sensitive information are all types of information attackers seek. Before we talk about ways to protect against phishing, let’s cover some common different types of these attacks.
Generic Phishing
The simplest form of phishing is where attacker gathers as many emails as they can from the target organization and uses all of them in their attack. This is a “spray-and-pray,” or shotgun approach, focusing on accuracy by volume.
The attacking email will look generic in this case, but it will contain contents that an average user may believe. Especially with the large shift from in-person meetings to Zoom due to COVID-19, a Zoom phishing email may be a good starting place. Below is an example of this type of phishing:
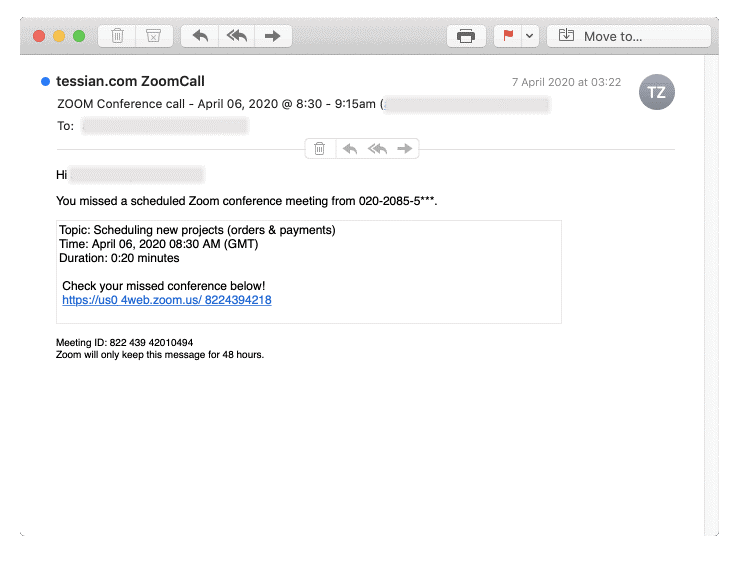
In this example, the link that claims to be to the missed conference is actually malicious. It may be malware, a fake sign-in page, or another nefarious payload. Whatever it is, the attacker’s goal is to get the target to click that link.
Spear Phishing
A more targeted attack, spear phishing is when an attacker either gathers specific emails pertaining to certain roles in an organization or targets one specific individual’s email.
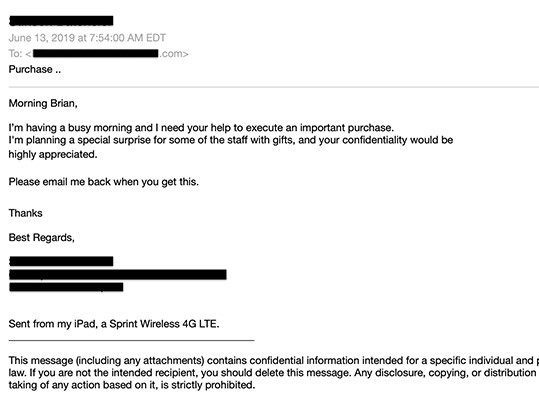
This attack often has trigger words that target the specific person or a small group of people within an organization. In the event of a specific person, the attacker may have found relevant and unique information pertaining to an individual. For a small group, the attacker may target users that are on a team or in a department of an organization, such as accounting, sales, customer service, etc.
In the spear phishing example below, the attacker has focused on a front desk staff member or an administrative assistant (spoofed to appear to be the person’s boss or another individual at their organization):
Whale Phishing (Whaling)
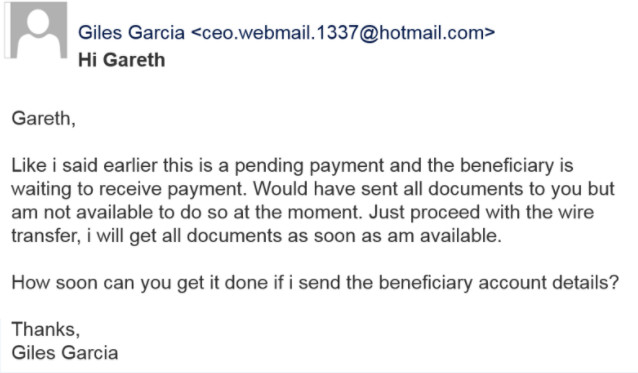
Whaling is like a spear phishing attack, except it focuses on targeting high-level management within the organization. One of the most common attacks is attempting to get a wire transfer. Below is an example:
Vishing
Vishing is the act of phishing via telephone (voice) instead of email. The attacker will call a victim to verify pieces of information from the victim, such as email or phone number. The attacker uses the data they already know to gain rapport on a call and ask for more sensitive information. For example, the attacker may claim to be a third-party IT vendor and, after verifying some of the victim’s information, may ask for details about the workstation, or even have the user install remote control software.
SMS Phishing (Smishing)
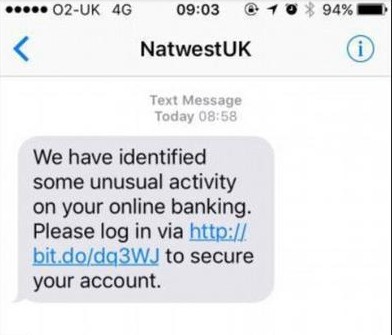
Finally, attackers can send your mobile device a text message with a seemingly urgent message – a package cannot be delivered until it is confirmed, a streaming account will be canceled if you don’t click this link and confirm, etc. – or a promise of money or an enticing prize.
Once the target clicks the link, a few things can happen. The link may then load malware directly onto their device, or the user may be taken to a spoof page. On that page, the user may enter their credentials or payment information, which are then sent to the attacker.
How can I protect myself and users against phishing attacks?
Although the task may feel daunting, there are many ways that you can prevent phishing attacks from reaching your users, and even more ways you can help your users identify phishing when they see it. While none of these methods are foolproof on their own, a combination of these methods can significantly decrease the likelihood of your users or your organization falling victim to attackers.
TRAINING!
First and foremost, train yourself and your team. Educate your users on how to identify phishing emails and what to do when they receive them. Below are some starting points to educate on, look for, or to be wary of:
- Does the domain look suspicious? Is the domain missing a character, or are there extra characters? Are any of the characters replaced with another character? Bitsquatting (registration of domains with similar spelling but with one or two characters changed), character addition, or homoglyphs can be an easy way to send a red flag to the user:

- Inform users about the dangers of sharing personal information on social media sites. An attacker may enumerate this information and use it against the user or your oganization. The more the attacker can learn, the more information they can use against the user when crafting phishing emails, specifically spear phishing.
- Encourage your users to speak up if they see anything suspicious. Spelling mistakes, suspicious links or attachments, a generic greeting, requests to login, or (even more explicit) requests to give your password are all forms of suspicious requests or behavior.
- Let your employees know that you would much prefer they report clicking a phishing link than the alterative, which could be an incident response investigation later. Additionally, tell your users that if they are unsure of an email, they can send it to you or to a certain IT email to verify the legitimacy.
- In the case of vishing attacks, have a code word or phrase to verify the caller’s identity. If the caller can’t reproduce this word or phrase, have the user report the call to either IT and/or their management.
- Establishing policies and procedure about who resource owners are can put users at ease in the event of a spear phishing email or even a vishing call. If the user knows who to expect specific requests from, or at least where to find that information, they may be less likely to share information or do tasks they weren’t expecting to be requested of them from that person.
- Conduct phishing exercises to track progress and verify that your users are learning effectively. There are platforms available to simulate a phishing attack. Contracting a third party to carry out this sort of exercise will also work, depending on company resources. Furthermore, conducting these exercises allows you to set a benchmark and track your results over time to show success or areas of improvement.
Deploy Multifactor Authentication
While training helps, it isn’t a silver bullet. When a user clicks on a link and potentially has their password compromised, multifactor authentication (MFA) can prevent the entire account from being compromised. MFA can be in the form of an SMS text message, push-button notifications, an authentication app, or a physical token with a changing code.
Many organizations use Office365. Use this document to help you get started setting up multifactor authentication in O365.
Most other platforms have MFA available; find the help resources for the tool you use and find out how to implement MFA for yourself and your users on your platforms.
Perform Reconnaissance
One of the best steps you can take to understand your risk is to understand your internet presence and that of your users. This will help identify vulnerabilities to remedy and will allow you to see what the attackers are likely able to see. With this knowledge, you will be able to protect your organization better.
There are many ways to go about this and tools available to do this, but we recommend using Discover.
Discover is a tool that uses several other tools to perform various reconnaissance searches. It will search social media sites, multiple search engines, DNS lookups, and several other valuable sources of information to see what is publicly available about the specific company name and the company’s domain. Types of information it finds can include emails, employee names and job titles, files hosted on the domain searched, subdomains, and more.
You can execute the steps below in Kali Linux to get and run Discover passive reconnaissance. On the GitHub page linked above, there is additional information about what Discover can do.
- git clone https://github.com/leebaird/discover /opt/discover/
- All scripts must run from this location.
- cd /opt/discover/
- ./update.sh
- Run discover
- ./opt/discover/discover.sh
- Select Domain
- 1
- Select Passive
- 1
- Enter in the name of your company and hit enter.
- Enter in your company’s domain and hit enter.
Upon execution of these commands, Discover will perform several checks to see what is publicly available. Review the findings and make sure the information you discovered is meant and/or intended to be public facing; all information Discover finds is accessible by the public. If you come across anything that isn’t meant to be public, remove it as quickly as possible.
Identify and Disclose Incoming External Emails
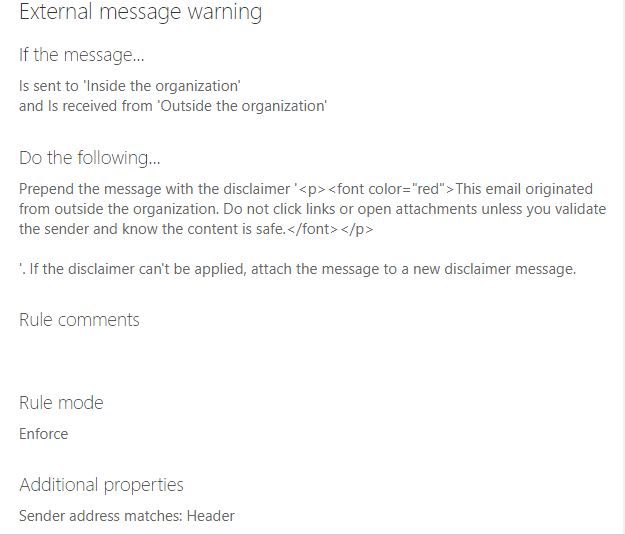
Another valuable tool in your phishing prevention toolbox is giving your users the immediate ability to easily recognize when an email originated outside of your organization. You can add a statement at the top of all incoming external emails stating that they came from outside of your organization.
This can help users know when they are viewing potentially malicious emails. This is especially helpful when attackers attempt to appear as though they are a colleague; the notice will quickly alert the recipient that the sender is not who they claim to be.
Within your O365 admin exchange portal, you can create such a message.
- Log into your O365 admin account at office.com
- Select the Admin app.
- Then select Exchange.
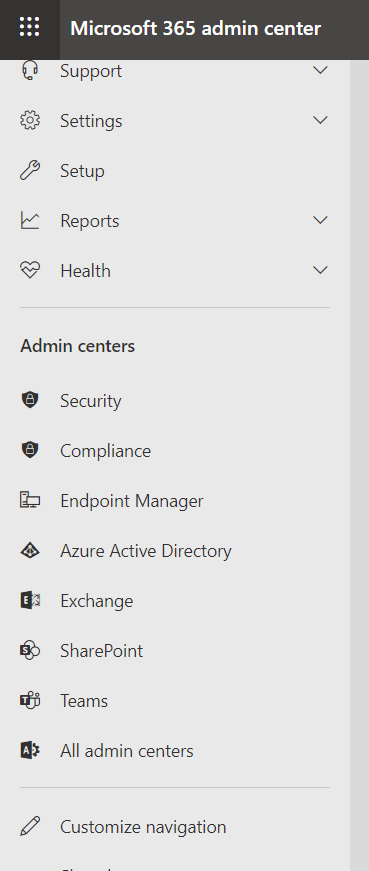
- Next, select Mail Flow.
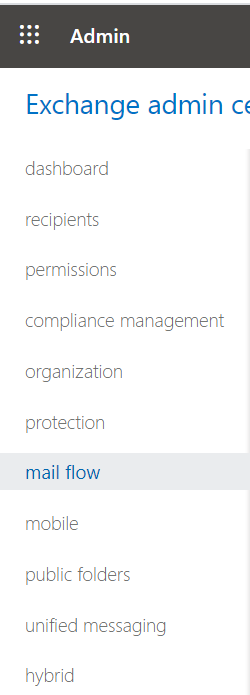
- Select the plus sign (+) and then select Create a new rule…
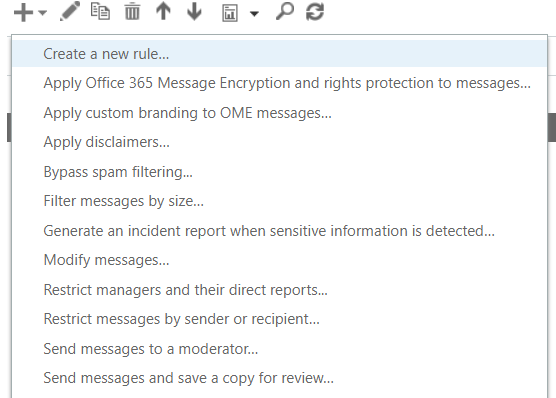
- Create your rule. Below is a sample to get started.
Configure Sender Policy Framework (SPF) Records
Next in our recommended phishing mitigation tactics is configuring sender policy framework (SPF) records. This is an email authentication method used to prevent malicious actors from using your domain to send spoofed emails. The SPF record lists all authorized host names and IP addresses that can send email on behalf of your domain.
There are several publicly available tools to check your SPF record. We will use Mxtoolbox.com. Once you’re there, enter your domain for SPF Record Lookup. If there is no record found, then you most likely don’t have an SPF record.
Here’s how you can create one.
- You will first need to state the version. The SPF record will start with “v=spf1”.
- v=spf1
- After this, specify the IP addresses that are allowed to send email from your domain
- ip4:1.2.3.4 ip6:1a2b:3c4d:5e6f:7g8h:9i10:j11k:12l1:3m14
- The next part is for any third-party domain that is allowed to send email on your behalf. You may need to consult with the third party to learn if there is a specific domain to indicate for this step.
- include:mydomain
- Lastly, there will be a -all, ~all, or +all. This creates a policy if a server is detected that isn’t included or specified previously in your SPF record.
- -all – fail: servers not listed are not allowed to send mail
- ~all – softfail: servers not listed are sent, but marked
- +all – allows any server to send email from your domain (not recommended)
- Here is an example: v=spf1 ip4:1.2.3.4 ip6:1a2b:3c4d:5e6f:7g8h:9i10:j11k:12l1:3m14 include:mydomain -all
Once created, you will need to publish your SPF record. You can do this by logging into your domain account for your domain host provider. There should be a section for managing the domain of your organization.
From there, you can create a new TXT record. Set the host field to the name of your domain, then fill out the TXT value of your SPF record (example above). You may specify a “Time to Live,” or have a default value. Save your record.
You have successfully published your SPF record! This update may take some time to fully go into effect. If you have any questions, contact your domain hosting provider.
Review Identity Score
If you need further guidance in your I365 environment, you can review your identity security score. Based on your configuration, Microsoft will score your organization and provide areas of improvement. One of the big-ticket items that will greatly increase your posture is turning on multifactor authentication.
You can review your score in the Azure AD portal. To do this:
- Log into your O365 admin account.
- Select Azure Active Directory
- Select Azure Active Directory again
- Select Security
- Select Identity Score
From here, you can review which controls to improve, as well as review which action items are the most severe.
The Big Picture
Although there are many types of phishing to watch out for, you can still protect yourself, your users, and your company. Training is imperative; understanding what a phishing attack looks like can help you and your users more easily spot them. Implementing MFA and other useful email configurations can help mitigate phishing attempts before they even reach your users. Once you know what to look for and how to implement simple but effective security measures, the chances of you or your team becoming victims of phishing attacks diminishes greatly.
This article was written by Mike of Team Ambush
For help with training, simulated phishing attacks, additional phishing attack examples, or social engineering, visit frsecure.com.


